
티스토리 뷰
CloudNet@의 가시다님 Ansible 1기 스터디에 참여하게 되어 배운 내용과 책의 내용을 함께 정리합니다.
📚 앤서블로 시작하는 인프라 자동화
앤서블로 시작하는 인프라 자동화 | 장현정 - 교보문고
앤서블로 시작하는 인프라 자동화 | 효율적인 IT 자동화를 위한 도구, 앤서블 설계부터 응용까지 단계별로 배우는 인프라 관리클라우드 컴퓨팅을 논할 때 IaC(Infrastructure as Code)를 빼놓을 수 없는
product.kyobobook.co.kr
1. Semaphore 소개
Introduction - Semaphore Docs
Semaphore is written in pure Go and available for Windows, macOS and Linux (x64, ARM, ARM64). Semaphore is an open-source project with concise and high-quality code.
docs.semui.co
1.1. 설치
설치 방식은 snap, package manager, docker, binary file 4가지를 지원합니다.
GitHub - ansible-semaphore/semaphore: Modern UI for Ansible
Modern UI for Ansible. Contribute to ansible-semaphore/semaphore development by creating an account on GitHub.
github.com
- package manager 방식 설치
# 설치
cd
pwd
wget https://github.com/ansible-semaphore/semaphore/releases/download/v2.9.45/semaphore_2.9.45_linux_amd64.deb
sudo dpkg -i semaphore_2.9.45_linux_amd64.deb

# Setup Semaphore by using the following command
semaphore setup
1. Set up configuration for a MySQL/MariaDB database
2. Set up a path for your playbooks (auto-created)
3. Run database Migrations
4. Set up initial semaphore user & password

What database to use:
   1 - MySQL
   2 - BoltDB
   3 - PostgreSQL
 (default 1): 2

...
db filename (default /home/ubuntu/database.boltdb):
Playbook path (default /tmp/semaphore):
Public URL (optional, example: https://example.com/semaphore):
Enable email alerts? (yes/no) (default no):
Enable telegram alerts? (yes/no) (default no):
Enable slack alerts? (yes/no) (default no): yes
Slack Webhook URL: https://hooks.slack.com/services/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
Enable LDAP authentication? (yes/no) (default no):
Config output directory (default /home/ubuntu/my-ansible):
...

> Username:  gasida   # 각자 자신의 닉네임
> Email: gasida@localhost
> Your name: gasida   # 각자 자신의 닉네임
> Password: qwe123

# ./semaphore server --config /home/ubuntu/config.json
# nohup ./semaphore server --config /home/ubuntu/config.json &
# You can login with admin@localhost or gasida.

# config.json 파일 확인
cat ./config.json | jq

# (터미널 2) Now you can run Semaphore : 태스크 실행 시 로그 확인 용도로 계속 터미널 열어 둠
# nohup semaphore server --config=./config.json &
semaphore service --config=./config.json


# Semaphore will be available via this URL
echo -e "Semaphore Web = http://$(curl -s ipinfo.io/ip):3000"

# CLI 확인
semaphore -h
semaphore version
semaphore user list

# tmp project home
mkdir /tmp/semaphore
- 웹 로그인 후 Project 생성
- semaphore에서 Project는 작업 간 분리 환경을 제공합니다.

1.2. 사용
사전 확인 : 계정 별 로그인 확인
- ubuntu 계정 ssh key 파일 로그인 확인
#
whoami

#
ls /home/ubuntu/.ssh/
ssh tnode1
ssh tnode2
ssh tnode3

ssh 10.10.1.11
ssh 10.10.1.12
ssh 10.10.1.13- root 계정 암호 입력으로 로그인 확인
#
sudo su -

# 암호는 qwe123
ssh tnode1
ssh tnode2
ssh tnode3
- Key Store : 암호 저장
- 용도 : remote hosts, remote Repo, sudo credentials, Ansible vault passwords
- 종류 : SSH, Login With Password, None, Personal Access Token(?)
- SSH : remote hosts, remote Repo에 SSH 접속 시 사용하는 SSH Keys
- Login With Password : 로그인 계정에 대한 암호 password 와 토큰 access Token
- remote hosts 로그인 시 암호
- remote hosts 에 sudo 사용 시 암호
- remote Repo over HTTPS 로그인 시 암호
- Ansible vaults 의 Unlock
- None : remote Repo 에 인증이 없는 경우
암호 생성
1. ansible-server 의 ubuntu 계정의 SSH 비밀키 복사

2. [Key Store] → NEW KEY 후 아래와 같이 생성
- ubuntu 계정의 ssh key

- root 계정의 login password

- remote Repo를 위한 None : none-Anonymous

- Repositories : playbooks 와 roles 위치한 곳
- 3가지 저장소 지원
- 로컬 Git Repo : *git://*
- 로컬 파일시스템 : *file://*
- 리모트 Git Repo : accessed over HTTPS(*https://*) , or SSH(*ssh://*)
- 인증 필요 : SSH 사용 시 SSH Key store , 인증 없을 경우 None type Key
- 3가지 저장소 지원

- Environment : 인벤토리에 추가 변수 저장하는 곳으로 JSON 포맷으로 작성
- [Environment] → NEW Environment
- Empty : Extra variables에 아래 입력
{}- User-cloudneta : Extra variables에 아래 입력
{
  "user" : "cloudneta"
}
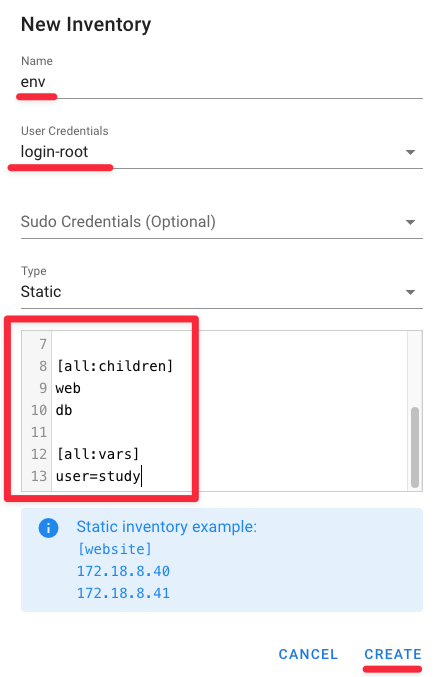
- Inventory : playbook가 실행될 호스트 목록, 변수 사용 가능, YAML/JSON/TOML 포맷
- [Inventory] → NEW Inventory
- all : sshkey-ubuntu

- env : login-ubuntu
1. 미리 플레이북 생성
/tmp/semaphore/fact.yml
cat << EOT > /tmp/semaphore/fact.yml
---

- hosts: all

  tasks:
  - name: Print all facts
    ansible.builtin.debug:
      msg: >
        The default IPv4 address of {{ ansible_facts.fqdn }}
        is {{ ansible_facts.default_ipv4.address }}
EOT
/tmp/semaphore/user.yml
cat << EOT > /tmp/semaphore/user.yml
---

- hosts: web
  tasks:
  - name: Create User {{ user }}
    ansible.builtin.user:
      name: "{{ user }}"
      state: present
EOT
2. [Task Templates] → NEW TEMPLATE
- facts : fact.yml , all , local , Empty , Cron(*/5 * * * *) - Cronitor

- users : user.yml , env, local, User-cloudneta

3. facts 실행 확인 : facts 태스크 템플릿은 이미 cron에 의해서 태스트가 실행이 되었습니다.


4. users 실행 확인


- 추가 변수 사용해보기 : 실행 시 파라미터로 변수 넘겨 주기 -e user=aws
- 템플릿 수정


1.3. 활용
- 팀 : 팀원 계정 추가
- 계정 추가 : 왼쪽 하단 admin 클릭 → Users 클릭

'DevOps > Ansible' 카테고리의 다른 글
| [A101] Ansible로 AWS EC2 생성 (0) | 2024.02.06 |
|---|---|
| [A101] Ansible - 모니터링 자동화 (1) | 2024.02.06 |
| [A101] Ansible - 보안설정 자동화 (0) | 2024.02.05 |
| [A101] Ansible - 시스템 구축 및 환경 설정 자동화 (0) | 2024.01.28 |
| [A101] Ansible - 앤서블 갤럭시와 콘텐츠 컬렉션 (0) | 2024.01.28 |